
Programming the ETC Video Synthesizer
This week, I spent some time playing with the Critter and Guitari ETC.
It’s an open source video synthesizer that runs Python and Pygame, and generates visuals meant to accompany a musical performance.
The device itself takes in an audio signal and an optional MIDI input, and runs a set of Pygame sketches that interact with the MIDI, Audio, and 4 adjustable knobs on the device.
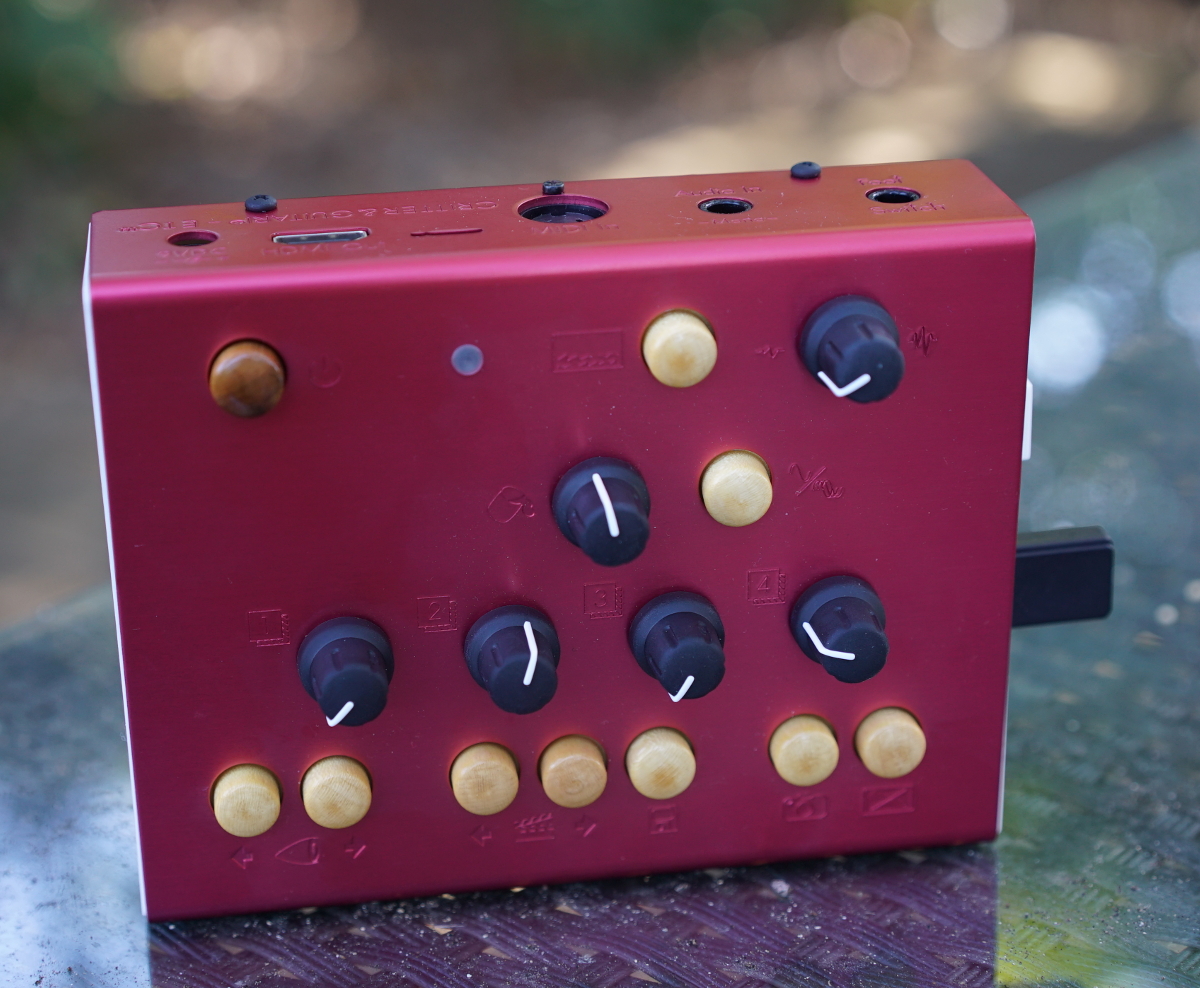
The ETC is just the sort of weird device that keeps programming exciting for me 15 years in. So let’s jump in and take a look at what’s possible with this odd red thing.
Forget the Rules, First Just Play with the Knobs
In order to get the device to work and hear your music at the same time, you’ll need some sort of a signal splitter.
I used a 1/4” splitter and a 1/4” to 3.5mm adapter to get my signal from the computer / phone into the ETC and speakers at the same time.
With this setup, I had a teenager hook up his phone and start playing with the knobs immediately.
It took him about 5 minutes to understand how the included Python sketches work, and he took a few screenshots from his favorite programs:
Overall, the device doesn’t really need to be reprogrammed at all. There’s enough programs preloaded on to the device itself to give you plenty to play around with any musical performance.
You can even just hook up a Spotify playlist, and leave the thing running as a background visualizer, without the need to adjust anything.
Nevermind the Knobs, Let’s Hack this Thing!
Of course, the first thing I wanted to do is play with the code on the device.
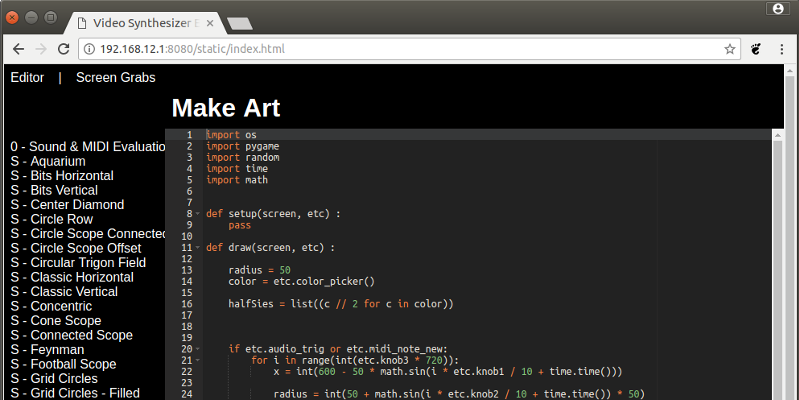
So I hooked up a WIFI dongle to ETC, and connected to its network, where I was greeted by a website that includes a list of all the programs on the device.
It even has a Javascript IDE built into the web interface, and you can type or modify existing programs there, and live reload them in the editor.
One cool thing about the IDE is, you can’t really break the programs. If something doesn’t work, the ETC just reloads the last working process. It seems like the draw function is wrapped in a try statement. (I found out later, the entire server is Open Source and available on Critter and Guitari’s Github account. And indeed, they are wrapped in try switches.)
There are a few drawbacks to using the web based editor. For now, there isn’t autocomplete or error handling. So if you mistype something, you’ll have to guess by looking at the screen to see whether or not your code is running or threw an exception.
Because of this, I ended up creating a small Python script to test ETC modules as I was writing them. You can download it at my Github repo. There are instructions on using it there.
The Mechanics of Programming the ETC
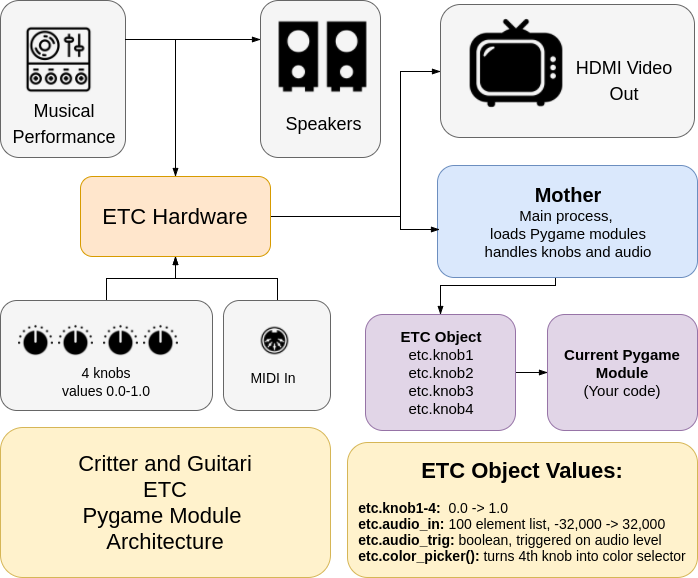
The ETC’s Pygame modules all work in a similar way to Processing or OpenFrameworks. There’s a setup function called before the main draw loop is called over and over again.
The parameters you’ll need to adjust are all included in an object that gets passed into your setup and draw functions. This is similar to other creative coding environments like Processing, in that you first setup the program to be looping, and then your draw function gets called every loop after your code has been drawn to the screen.
The ETC’s draw loop calls are unique, in that you don’t need to have a screen clearing call in your drawing routine. This is because the main program (or Mother as it’s called on Github) has an interface on the ETC itself to decide whether or not to clear the screen, or change the background color.
With this, we’re left with 4 knobs, each accessible via a etc.knob1 - etc.knob4. These are all set to a number between 0 and 1, and by multiplying the number by a set range, we can have them manipulate values in our Pygame programs.
We’re also given an etc.audio_in list, that contain 100 samples of levels for the audio input. Again, if we add and multiply each of these numbers by a scalar, we can have some visual feedback directly in our program.
And finally, we’ve got a dedicated knob for what’s called etc.audio_trig. This checks for a threshold volume to trigger an event on the ETC. With this, we can trigger events to happen from within our loops.
Adapting A Piece of Code for the ETC
I was inspired by this talk by Zach Lieberman, where he does a quick demo in OpenFrameworks, building up a set of circles into a wavey form.
So I adapted it to the ETC, as a way to show how to take an existing program, and add some parameters to make it interactive with those knobs.
The code for it is straightforward enough. Zach’s original code, ported to Python and Pygame looks something like this:
import pygame
import random
import time
import math

# original code adapted from zach lieberman's talk
# https://www.youtube.com/watch?v=bmztlO9_Wvo

def setup(screen, etc):
    pass

def draw(screen, etc):
    for i in range(720):
        color = (int(127 + 127 * math.sin(i * .01 + time.time())),
                 int(127 + 127 * math.sin(i * .011 + time.time())),
                 int(127 + 127 * math.sin(i * .012 + time.time())))
        radius = int(50 + 40 * math.sin(i * .005 + time.time()))
        xpos = int(1280 // 2 + 100 * math.sin(i * .02 + time.time()))
        pygame.gfxdraw.filled_circle(screen, xpos, i, radius, color)
With this code as our base, we can use an etc-test.py to run a copy locally. Grab the file from my repository, and run it from the command line like this:
$ python3 etc-test.py zach-in-pygame
You should have a new window pop up, and see the wave across the screen. Great, now let’s make the knobs do stuff!
Putting those Knobs in Our Program
As I said before, each of our knobs on the ETC gives us a value between 0 and 1.
In order to have this make sense in our program, we need to scale (aka multiply) this value by a number range in order to have it make sense.
For example, let’s say we wanted to control where our initial sine wave is on the screen.
In our initial code, we put it right in the center with out x position starting with 1280 // 2. Instead of this, we can do 1280 * etc.knob1, and end up with a control knob for where on the screen it fits.
So we can scale these knob values to be appropriate for different things in our code. Here’s what I ended up with after a half hour or so of playing:
import os
import pygame
import random
import time
import math


def setup(screen, etc) :
    pass

def draw(screen, etc) :

    radius = 50
    color = etc.color_picker()

    halfSies = list((c // 2 for c in color))


    if etc.audio_trig or etc.midi_note_new:
        for i in range(int(etc.knob3 * 720)):
            x = int(600 - 50 * math.sin(i * etc.knob1 / 10 + time.time()))

            radius = int(50 + math.sin(i * etc.knob2 / 10 + time.time()) * 50)

            color = (halfSies[0] + int(halfSies[0] * math.sin(i * .01 + time.time())),
                     halfSies[1] + int(halfSies[1] * math.sin(i * .01 + time.time())),
                     halfSies[2] + int(halfSies[2] * math.sin(i * .01 + time.time())))

            pygame.gfxdraw.filled_circle(screen,
                                         x,
                                         i,
                                         radius,
                                         color)
            pygame.gfxdraw.filled_circle(screen,
                                         x - 1280 // 4,
                                         i,
                                         radius,
                                         color)
            pygame.gfxdraw.filled_circle(screen,
                                         x + 1280 // 4,
                                         i,
                                         radius,
                                         color)

            pygame.gfxdraw.filled_circle(screen,
                                         x,
                                         720 - i,
                                         radius,
                                         color)
            pygame.gfxdraw.filled_circle(screen,
                                         x - 1280 // 4,
                                         720 - i,
                                         radius,
                                         color)
            pygame.gfxdraw.filled_circle(screen,
                                         x + 1280 // 4,
                                         720 - i,
                                         radius,
                                         color)

    else:
        for i in range(720):
            x = int(600 - 50 * math.sin(i * etc.knob1 / 10 + time.time()))

            radius = int(50 + math.sin(i * etc.knob2 / 10 + time.time()) * 50)

            color = (halfSies[0] + int(halfSies[0] * math.sin(i * .01 + time.time())),
                     halfSies[1] + int(halfSies[1] * math.sin(i * .015 + time.time())),
                     halfSies[2] + int(halfSies[2] * math.sin(i * .021 + time.time())))
            pygame.gfxdraw.filled_circle(screen,
                                         x,
                                         i,
                                         radius,
                                         color)
You’ll see I also added in a special case for when we have an etc.audio_trig event. This is triggered when the threshold of the audio passes above the level set by the top right most knob.
Where to Go From Here

This post barely scraped the surface of what’s possible with the ETC and Pygame. You can load images, animate things, and do basic physics interactions, all on the device. It’s really open to your imagination.
I’ve created a Github repo with all the code I’ve written while having the ETC in my home. There’s another program I wrote there, that uses 10 Print and the etc.audio_in list to do audio reactive animations.
If you’re still learning Python and Pygame, or you want a visual introduction to programming, check out my book, Make Art with Python.
In it, we take step by step lessons to learn how to write Pygame art works in Python. It’s the perfect introduction to coding a device like the ETC.
Finally, feel free to share this post with your friends. It helps me to continue making these sort of tutorials.
