
Slit Scan Images in Python and MoviePy
Slit-scan photography is a technique where a slit is moved between the camera and the subject. It’s effect lets the viewer see a tiny slice of a movement, through time.
Most notably, it was used in 2001: A Space Odyssey for the stargate scene.
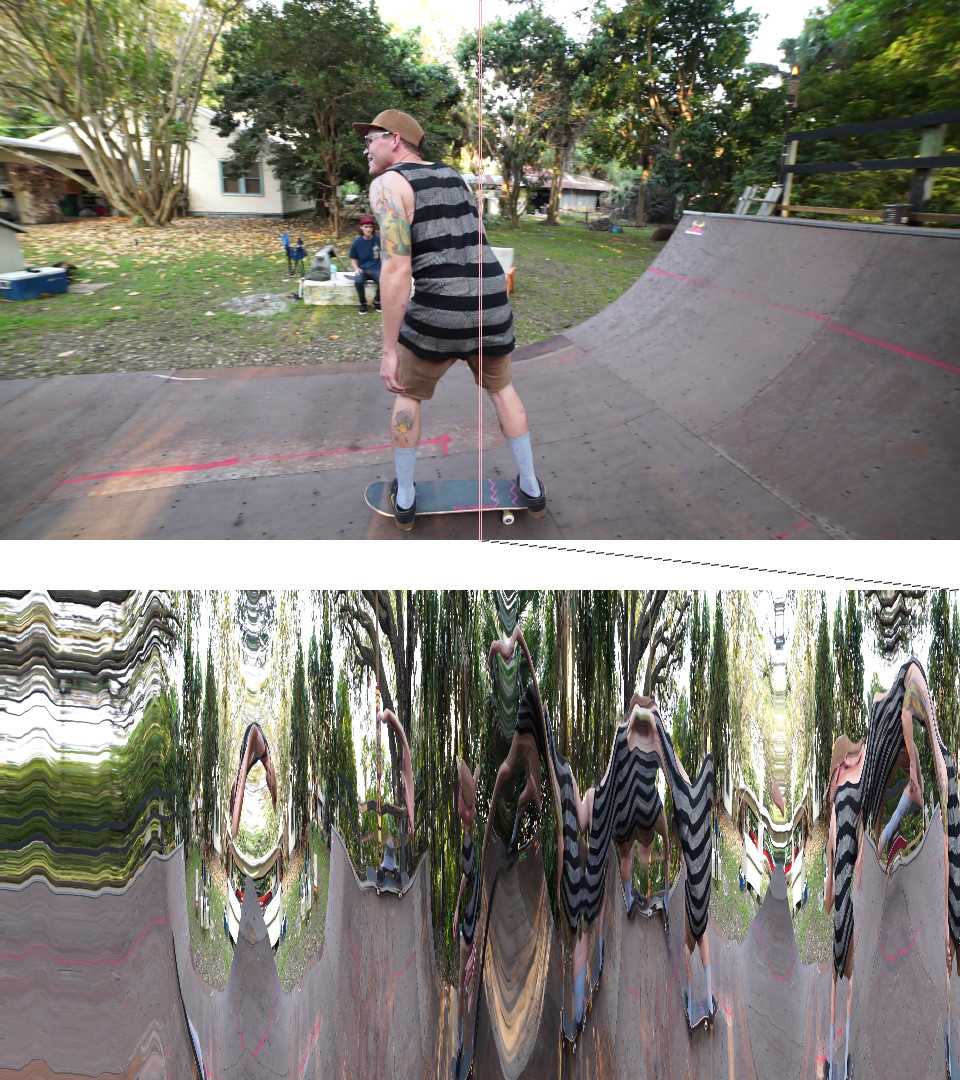
Today, we’ll generate a slit scan image from a source video. To do this, we’ll start with a source clip, and then take the pixels from a single column in the image, frame by frame.
By stepping through these frames, we’ll end up with a final image, built through the pixels in that one column over time.
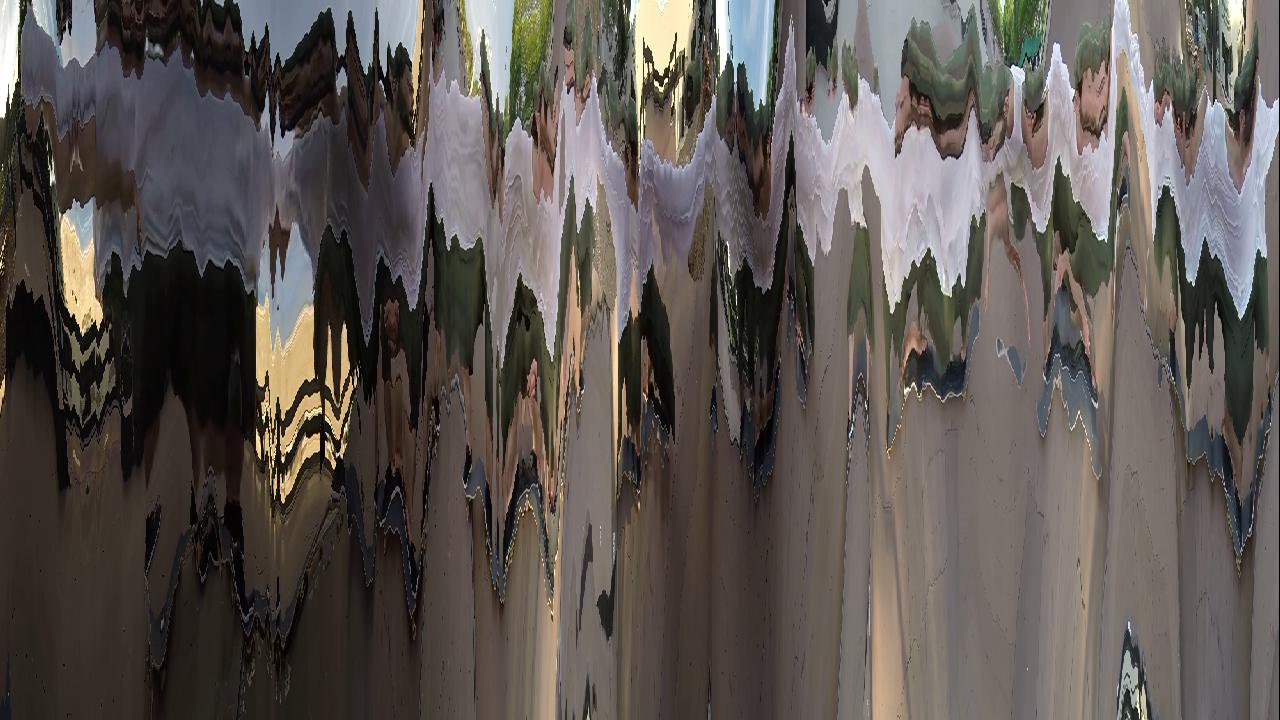
The end result will be something like this:
The Tools of Slit Scanning in Python 3
Python has a few options for working with videos.
For slit scanning, we’re going to need a library that gives us a way to access individual frames from a video. Ideally, the library would also give us pixel access to each individual frame.
Luckily, MoviePy gives us both.
MoviePy’s VideoFileClip gives us a frame generator, for a specified frames per second for a source video. Each of these frames is returned as a NumPy array, with a shape of (height, width, 3). We can also specify a color depth, to keep our colors consistent. For today, I’ll use unsigned 8 bit integers.
To save out our images, I’m going to use the Pillow, or Python Imaging library. Its Image object has a fromarray function, which generates a savable image object. We’ll use that to take a NumPy array filled with our slit scans, and save out to disk.
Both these libraries are easily installed via pip:
$ pip install Pillow
$ pip install moviepy
Start with Command Line Options
When working a new program, I like to first build out any arguments that may need to be passed into my code.
The argparse library built into Python allows for taking in command line arguments, and returning said arguments as variables.
For our slit scan program, we’ll pass an mp4 to open for slit scan generation:
import argparse

parser = argparse.ArgumentParser()
parser.add_argument("filename", help="filename to generate slit scan image from")
args = parser.parse_args()

print('opening %s for to generate slit scan image' % args.filename)
With the arguments read in properly, we’re now ready to jump into getting our data from MoviePy.
Working with Videos in MoviePy
Whenever I look at a new library, I like to first open it in an iPython session, and see how the API and data structures work.
For MoviePy, there’s the VideoFileClip object, which allows us to open video files for frame by frame manipulation. Let’s see how it works:
$ ipython
Python 3.5.2 (default, Sep 14 2017, 22:51:06)
Type "copyright", "credits" or "license" for more information.

IPython 5.1.0 -- An enhanced Interactive Python.
?         -> Introduction and overview of IPython's features.
%quickref -> Quick reference.
help      -> Python's own help system.
object?   -> Details about 'object', use 'object??' for extra details.

In [1]: from moviepy.editor import VideoFileClip

In [2]: clip = VideoFileClip('input.mp4')

In [3]: clip.size
Out[3]: [1280, 720]

In [4]: clip.duration
Out[4]: 20.01

In [5]: clip.iter_frames(fps=30, dtype='uint8')
Out[5]: <generator object Clip.iter_frames.<locals>.generator at 0x7fd025f8d410>
With this, we can start to get a feel for how our input video could be manipulated. We can see we can access the width and height of our video using clip.size, and also get our duration in seconds using clip.duration.
Importantly, we can see that our iter_frames function call returns a generator. In Python, we can see inside generators by wrapping then in a next function like this:
In [6]: a = clip.iter_frames(fps=30, dtype='uint8')

In [7]: a
Out[7]: <generator object Clip.iter_frames.<locals>.generator at 0x7fcf994336d0>

In [8]: frame = next(a)

In [9]: type(frame)
Out[9]: numpy.ndarray

In [10]: frame.shape
Out[10]: (720, 1280, 3)
We can now see how MoviePy’s iter_frames returns NumPy arrays, with our (height, width, and RGB) values. Taking a slit of pixels is as easy as using the NumPy slice operator, either horizontally or vertically. To begin with, let’s take a vertical set of pixels:
In [11]: frame[:,1280//2,:].shape
Out[11]: (720, 3)
Here we see how the slices work differently for NumPy arrays. Instead of having a [][][] accessor like in a Python list, instead we have a comma separated accessor. With this slice we’re taking the full height (:), the middle pixel (the width integer divided by 2), and all of the Red, Green and Blue values in the final frame.
Thinking Through Our Output
Now that we know how to access our frames, and how to grab a single column or row of pixels, it’s time we think through how we’re going to generate output.
Pillow has a few built in methods for writing to images pixel by pixel. The easiest one is called a PixelAccess object.
However, PixelAccess is a different type from our input. Remember, we’re being given a NumPy array as an input, and it’s accessed in an entirely different way from a PixelAccess object.
Instead of trying to push our row of NumPy pixels into a PixelAccess object, we’ll create a NumPy array from scratch, and then copy our NumPy image slices directly into a NumPy array of the same shape. After we’ve finished, we can then use the Image method fromarray to convert our ndarray back into an image for saving.
With that data manipulation solved, next is thinking about the dimensions of our output image, and how they’ll come together.
In order to generate an output image for our source video that fills the same shape, we’ll need a total of 1280 frames for a column slit scan. That’s because each frame only fills a single pixel on our output image’s width, and if we’re beginning with the same shape, we’re going to have to reach 1280 pixel width.
If your source video is 1920x1080, you’re going to need at least 1920 frames in order to fill a fully stretched image.
By using the fps variable passed into our iter_frames match the width of our video divided by the duration, we should be able to fill the entire screen. Later, we can optimize and change this if it doesn’t look great.
Putting It Together
With our settled process for generating our output image, we can now pull in our ideas together, and write a first pass at a program. So let’s jump to that now:
import argparse

parser = argparse.ArgumentParser()
parser.add_argument("filename", help="filename to generate slit scan from")
args = parser.parse_args()

print('opening file %s for slit scanning' % args.filename)

from moviepy.editor import VideoFileClip
import numpy as np

from PIL import Image

clip = VideoFileClip(args.filename)

print('%s is %i fps, for %i seconds at %s' % (args.filename, clip.fps, clip.duration, clip.size))

# np.zeros is how we generate an empty ndarray
img = np.zeros((clip.size[1], clip.size[0], 3), dtype='uint8')

currentX = 0
slitwidth = 1

slitpoint = clip.size[0] // 2

# generate our target fps with width / duration
target_fps = clip.size[0] / clip.duration

for i in clip.iter_frames(fps=target_fps, dtype='uint8'):
    if currentX < (clip.size[0] - slitwidth):
        img[:,currentX:currentX + slitwidth,:] = i[:,slitpoint:slitpoint+slitwidth,:]
    currentX += slitwidth

output = Image.fromarray(img)
output.save('output.png')
We can now run our program on a source video, and see what we get. For me, I get an image like this:
Bonus: Slitscan Gifs with VideoClip

Static images are great, sure. But gifs are what the kids are into nowadays.
Creating a gif like above is easy enough, using the VideoClip object supplied by MoviePy. It takes a function that generates a frame for every timepoint in seconds, up until a duration. We can then write out a gif using the write_gif function call with a specified frame rate.
import argparse

parser = argparse.ArgumentParser()
parser.add_argument("filename", help="filename to generate slit scan image from")
args = parser.parse_args()

from moviepy.editor import VideoFileClip, VideoClip
from PIL import Image

import numpy as np

clip = VideoFileClip(args.filename).resize(0.2)

print('%s is %i fps, for % seconds at %s' % (args.filename, clip.fps, clip.duration, clip.size))

img = np.zeros((clip.size[1], clip.size[0], 3), dtype='uint8')

currentX = 0
slitwidth = 1

slitpoint = clip.size[1] // 2

frame_generator = clip.iter_frames(fps=clip.fps, dtype='uint8')

def make_frame(t):
    global img, currentX
    next_frame = next(frame_generator)
    img = np.roll(img, -1, axis=0)
    img[slitpoint,:,:] = next_frame[slitpoint,:,:]
    next_frame[max(slitpoint - currentX, 0):slitpoint,:,:] = img[max(0, slitpoint - currentX):slitpoint,:,:]

    currentX += 1
    return next_frame

output = VideoClip(make_frame=make_frame, duration=10.5)
output.write_gif('output1.gif', fps=12)
As you can see, with this code we take a row of pixels, and move them up, towards the top of the image with the np.roll. We also add a max function call, to make sure we don’t try to access a negative part of our array in our slice.
Where to Go From Here
If you’re looking for more slit scan inspiration, I recommend you check out Golan Levin’s Informal Catalogue of Slit-Scan Video Artworks and Research. It gives a pretty exhaustive list of things that have been done using this technique.
All code is available at Github, as usual. Feel free to make pull requests if you come up with something new.
If you enjoyed this post, and would like to see more creative programming posts, I recommend subscribing to my newsletter. I’d also appreciate you sharing this post on your social media.
Finally, if you’re interested in learning software development, or you know somebody who is, I’ve written a book called Make Art with Python, and it will be available for purchase here soon.
For now, you can sign up as a user on this site, and get access to the first three chapters, along with a video walk through for each chapter, just like on this page.
